Circle CI with Nx
In this tutorial we're going to learn how to leverage Nx to setup a scalable CI pipeline on Circle CI. You're going to learn
- how to set up Circle CI and configure Nx
- how to run tasks for only the projects that were affected by a given PR
- how to enable remote caching
- how to parallelize and distribute tasks across multiple machines
Note, many of these optimizations are incremental, meaning you could set up running tasks for only affected projects and stop there. Later when you experience slow CI runs, you could add caching to further improve CI performance or even go further and distribute tasks across machines.
Example Repository
To follow along with this tutorial, we recommend using the nx-shops sample repository.
Example repository/nrwl/nx-shops
The nx-shops repo is useful to demonstrate the value of the CI pipeline because it has the following characteristics:
- Multiple Nx projects with interdependencies
- Defined lint, test, build and e2e tasks
- Running all the tasks takes more than a minute to finish
To get started:
Fork the nx-shop repo and then clone it to your local machine
❯
git clone git@github.com:<your-username>/nx-shops.git
Install dependencies (this repo uses PNPM but you should be able to also use any other package manager)
❯
pnpm i
Explore the structure of the repo using the Nx Graph
❯
pnpm nx graph
Finally, make sure all task are working on your machine, by running lint, test, build and e2e on all projects of the workspace
❯
pnpm nx run-many -t lint,test,build,e2e
Set-up Circle CI
In order to use Circle CI, you need to sign up and create an organization. Follow the steps in the Circle CI documentation to connect to your GitHub repository. When you are asked to configure a pipeline, choose any option, since we'll overwrite it in the next step.
To verify that Circle CI is set up correctly we'll create a pipeline that just logs a message. First, checkout a new branch:
❯
git checkout -b circle-message
Then create (or modify) the .circleci/config.yml file with these contents:
1version: 2.1
2
3jobs:
4  main:
5    docker:
6      - image: cimg/node:lts-browsers
7    steps:
8      - run:
9          name: Print a message
10          command: echo "Hello Circle CI!"
11
12workflows:
13  version: 2
14
15  ci:
16    jobs:
17      - main
18
Next, commit this change, push the branch and create a PR on your forked GitHub repository:
❯
git commit -am "pipeline that logs a message"
❯
git push -u origin HEAD
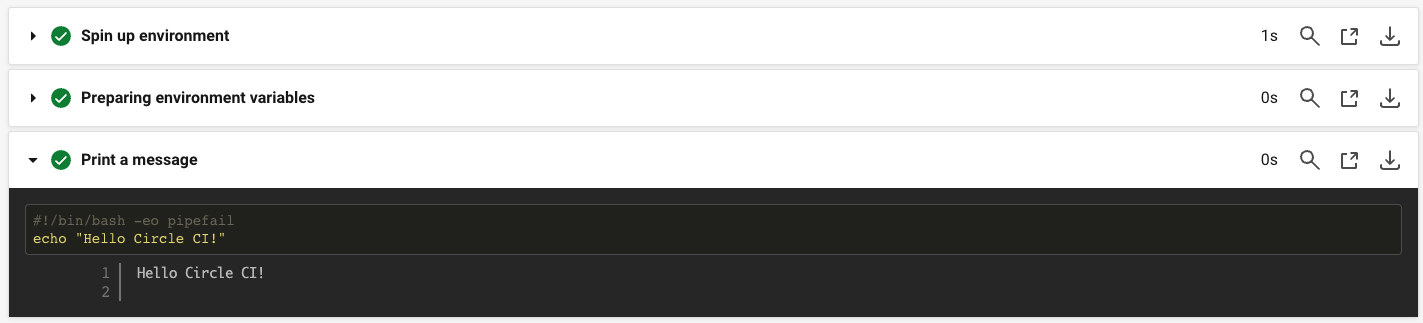
If everything was set up correctly, you should see a message from Circle CI in the PR with a success status.
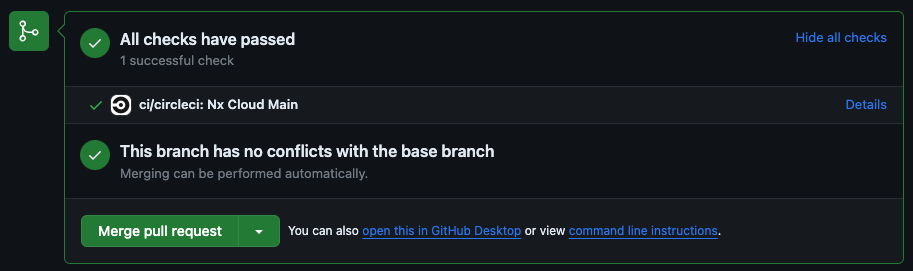
Click on the job details and you should see the Hello Circle CI message in the logs.
Merge your PR into the main branch when you're ready to move to the next section.
Configure Nx on Circle CI
Now let's use Nx in the pipeline. The simplest way to use Nx is to run a single task, so we'll start by building our cart application.
❯
pnpm nx build cart
We need to adjust a couple of things on our CI pipeline to make this work:
- clone the repository
- install NPM dependencies (in our nx-shop using PNPM)
- use Nx to run the
buildcommand
Nx is an npm package so once NPM packages are installed we will be able to use it.
Create a new branch called build-one-app and paste this code into the Circle CI config.
1version: 2.1
2
3jobs:
4  main:
5    docker:
6      - image: cimg/node:lts-browsers
7    steps:
8      - checkout
9      - run:
10          name: install dependencies
11          command: pnpm install --frozen-lockfile
12      - run:
13          name: Run build
14          command: pnpm nx build cart
15
16workflows:
17  version: 2
18
19  ci:
20    jobs:
21      - main
22
Once node_modules are in place, you can run normal Nx commands. In this case, we run pnpm nx build cart. Push the changes to your repository by creating a new PR and verifying the new CI pipeline correctly builds our application.
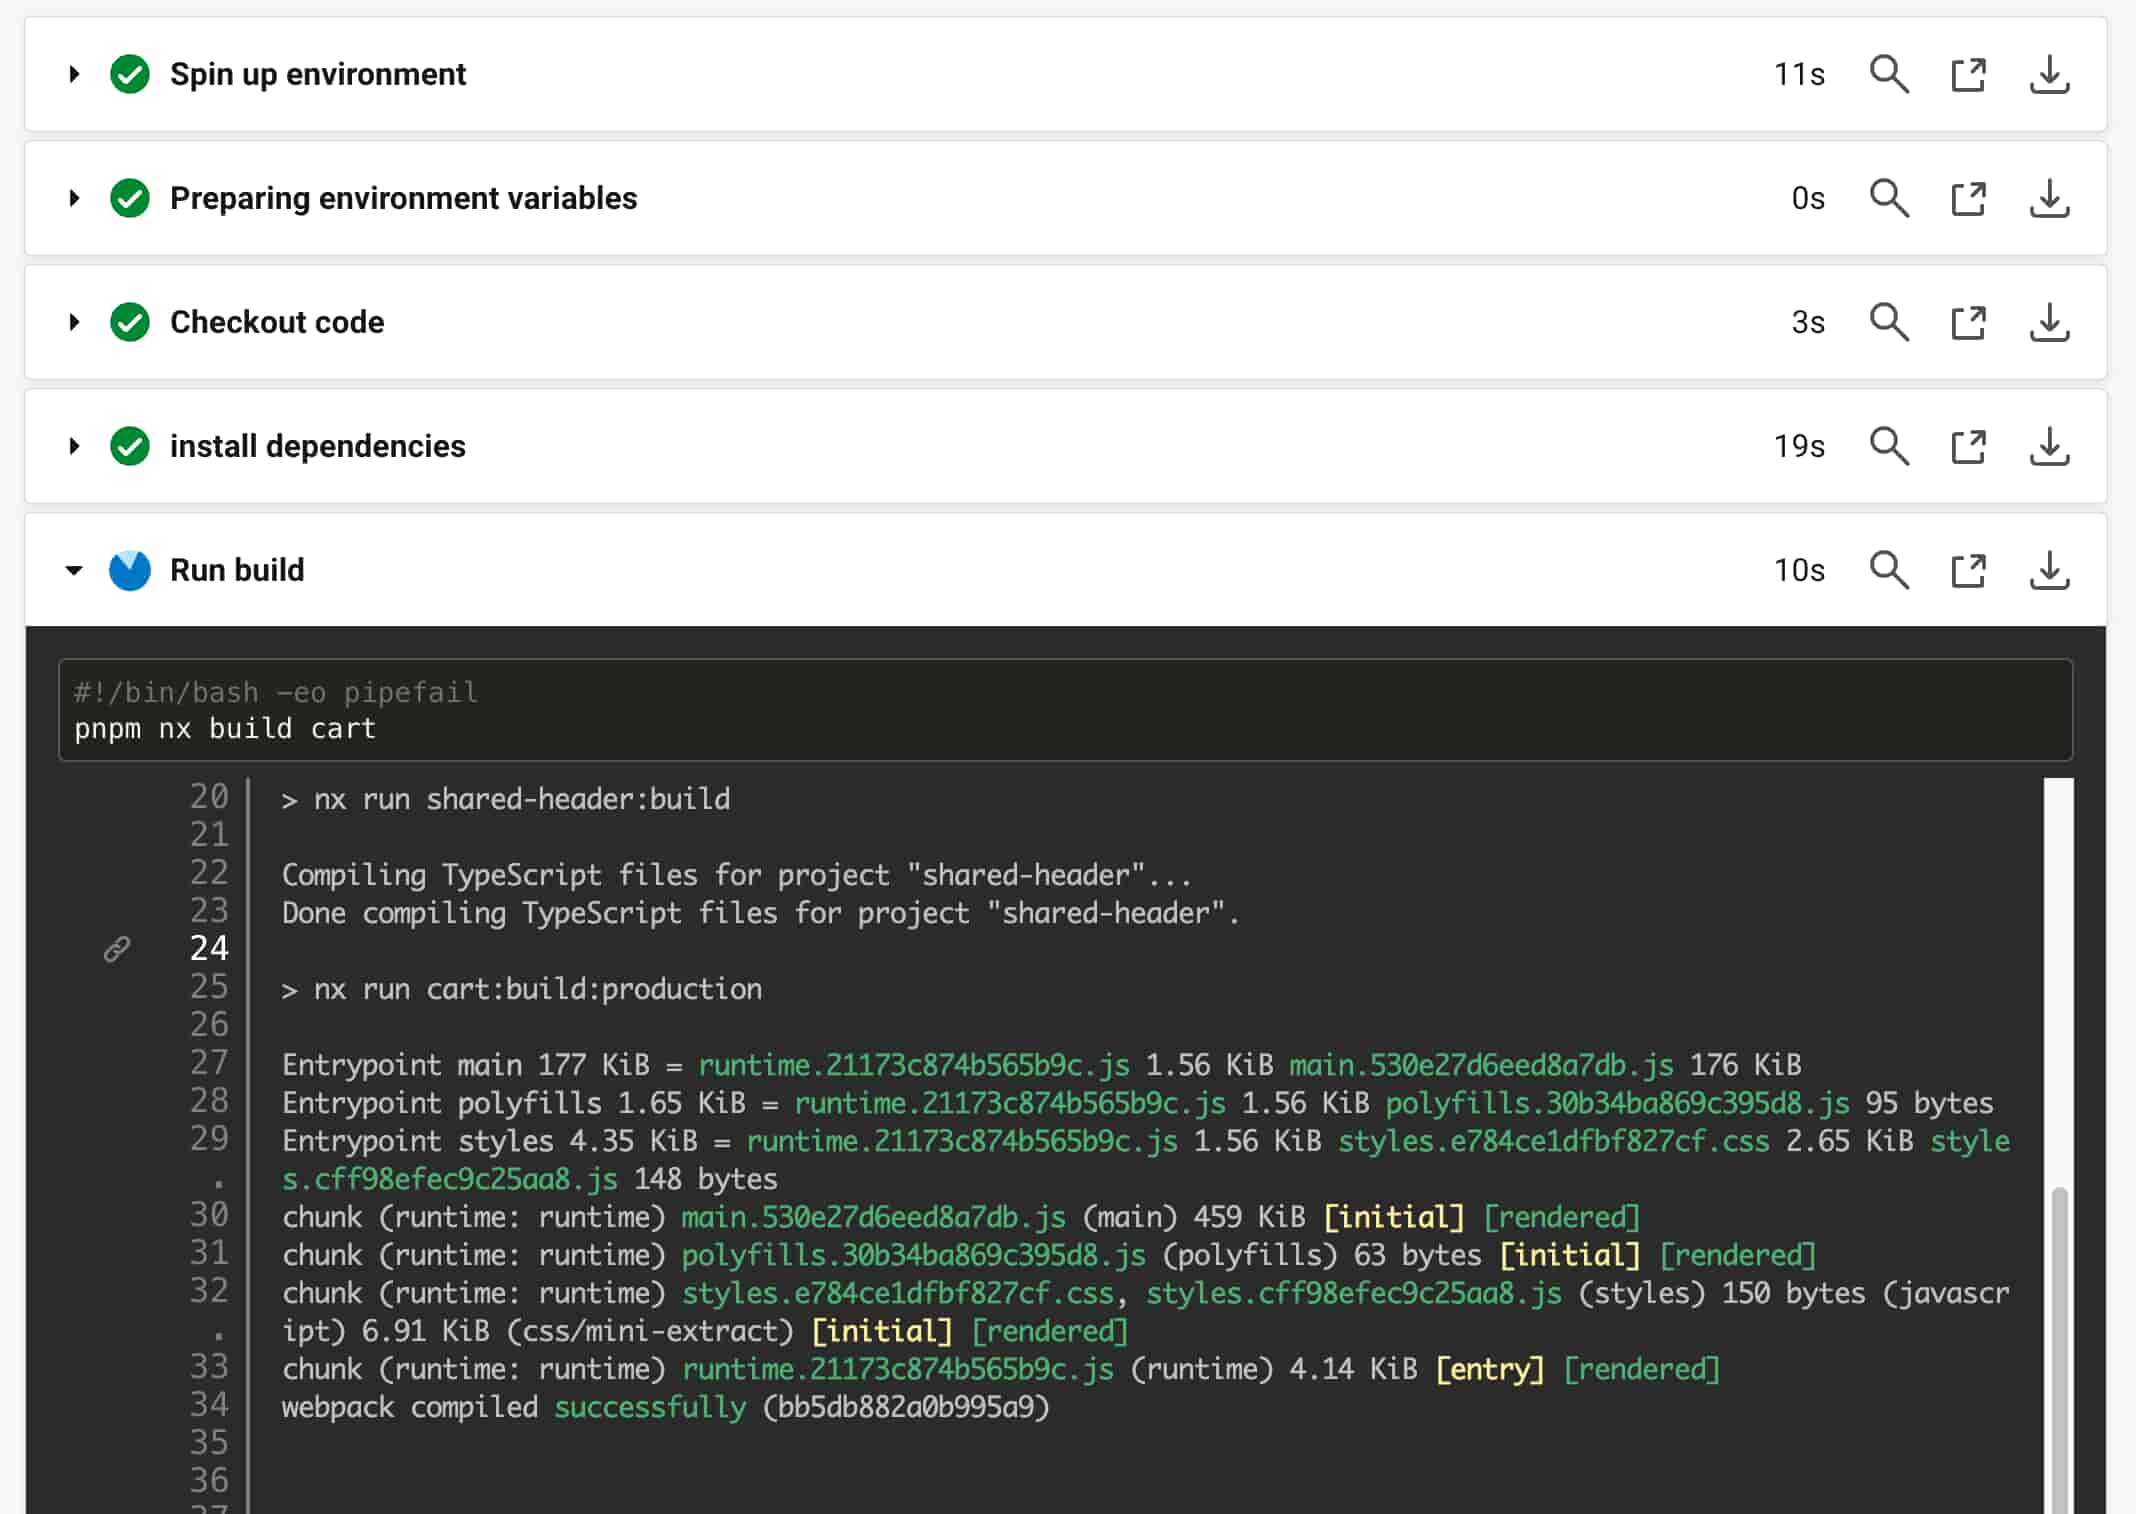
You might have noticed that there's also a build running for shared-header, shared-product-types and shared-product-ui. These are projects in our workspace that cart depends on. Thanks to the Nx task pipeline, Nx knows that it needs to build these projects first before building cart. This already helps us simplify our pipeline as we
- don't need to define these builds automatically
- don't need to make any changes to our pipeline as our
cartapp grows and depends on more projects - don't need to worry about the order of the builds
Merge your PR into the main branch when you're ready to move to the next section.
Optimize our CI by caching NPM dependencies
While this isn't related to Nx specifically, it's a good idea to cache NPM dependencies in CI. This will speed up the CI pipeline by avoiding downloading the same dependencies over and over again. Circle CI has a docs page on how to cache NPM dependencies.
Adjust your CI pipeline script as follows
1version: 2.1
2
3jobs:
4  main:
5    docker:
6      - image: cimg/node:lts-browsers
7    steps:
8      - checkout
9      # look for existing cache and restore if found
10      - restore_cache:
11          key: npm-dependencies-{{ checksum "pnpm-lock.yaml" }}
12      # install dependencies
13      - run:
14          name: install dependencies
15          command: pnpm install --frozen-lockfile
16      # save any changes to the cache
17      - save_cache:
18          key: npm-dependencies-{{ checksum "pnpm-lock.yaml" }}
19          paths:
20            - node_modules
21            - ~/.cache/Cypress # needed for the Cypress binary
22      - run:
23          name: Run build
24          command: pnpm nx build cart
25
26workflows:
27  version: 2
28
29  ci:
30    jobs:
31      - main
32
The restore_cache and save_cache steps are using a hash key that is created from the contents of the pnpm-lock.yaml file. This way if the pnpm-lock.yaml file remains the same, the next CI pipeline can pull from the cache instead of downloading node_modules again. This is similar to the way Nx hashes input files to cache the results of tasks.
Create a new branch with these changes and submit a PR to your repo to test them. Merge your PR into the main branch when you're ready to move to the next section.
Process Only Affected Projects
So far we only ran the build for our cart application. There are other apps in our monorepo workspace though, namely admin, landing-page and products. We could now adjust our CI pipeline to add these builds as well:
1pnpm nx build cart
2pnpm nx build admin
3pnpm nx build landing-page
4
Clearly this is not a scalable solution as it requires us to manually add every new app to the pipeline (and it doesn't include other tasks like lint, test etc). To improve this we can change the command to run the build for all projects like
~/workspace❯
nx run-many -t build
1    ✔  nx run shared-product-types:build (429ms)
2    ✔  nx run shared-product-ui:build (455ms)
3    ✔  nx run shared-header:build (467ms)
4    ✔  nx run landing-page:build:production (3s)
5    ✔  nx run admin:build:production (3s)
6    ✔  nx run cart:build:production (3s)
7
8 ————————————————————————————————————————————————————————————————
9
10 >  NX   Successfully ran target build for 6 projects (10s)
11
This change makes our CI pipeline configuration more maintainable. For a small repository, this might be good enough, but after a little bit of growth this approach will cause your CI times to become unmanageable.
Nx comes with a dedicated "affected" command to help with that by only running tasks for projects that were affected by the changes in a given PR.
~/workspace❯
nx affected -t build
1    ✔  nx run shared-product-types:build (404ms)
2    ✔  nx run shared-product-ui:build (445ms)
3    ✔  nx run shared-header:build (465ms)
4    ✔  nx run cart:build:production (3s)
5
6 ——————————————————————————————————————————————————————————————————————————————————————
7
8 >  NX   Successfully ran target build for project cart and 3 tasks it depends on (4s)
9
Configuring the Comparison Range for Affected Commands
To understand which projects are affected, Nx uses the Git history and the project graph. Git knows which files changed, and the Nx project graph knows which projects those files belong to.
The affected command takes a base and head commit. The default base is your main branch and the default head is your current file system. This is generally what you want when developing locally, but in CI, you need to customize these values.
The goal of the CI pipeline is to make sure that the current state of the repository is a good one. To ensure this, we want to verify all the changes since the last successful CI run - not just since the last commit on main.
While you could calculate this yourself, we created the nrwl/nx Circle CI orb to help with that. It provides you with the nx/set-shas step which automatically sets the $NX_BASE and $NX_HEAD environment variables to the correct commit SHAs for you to use in the affected command.
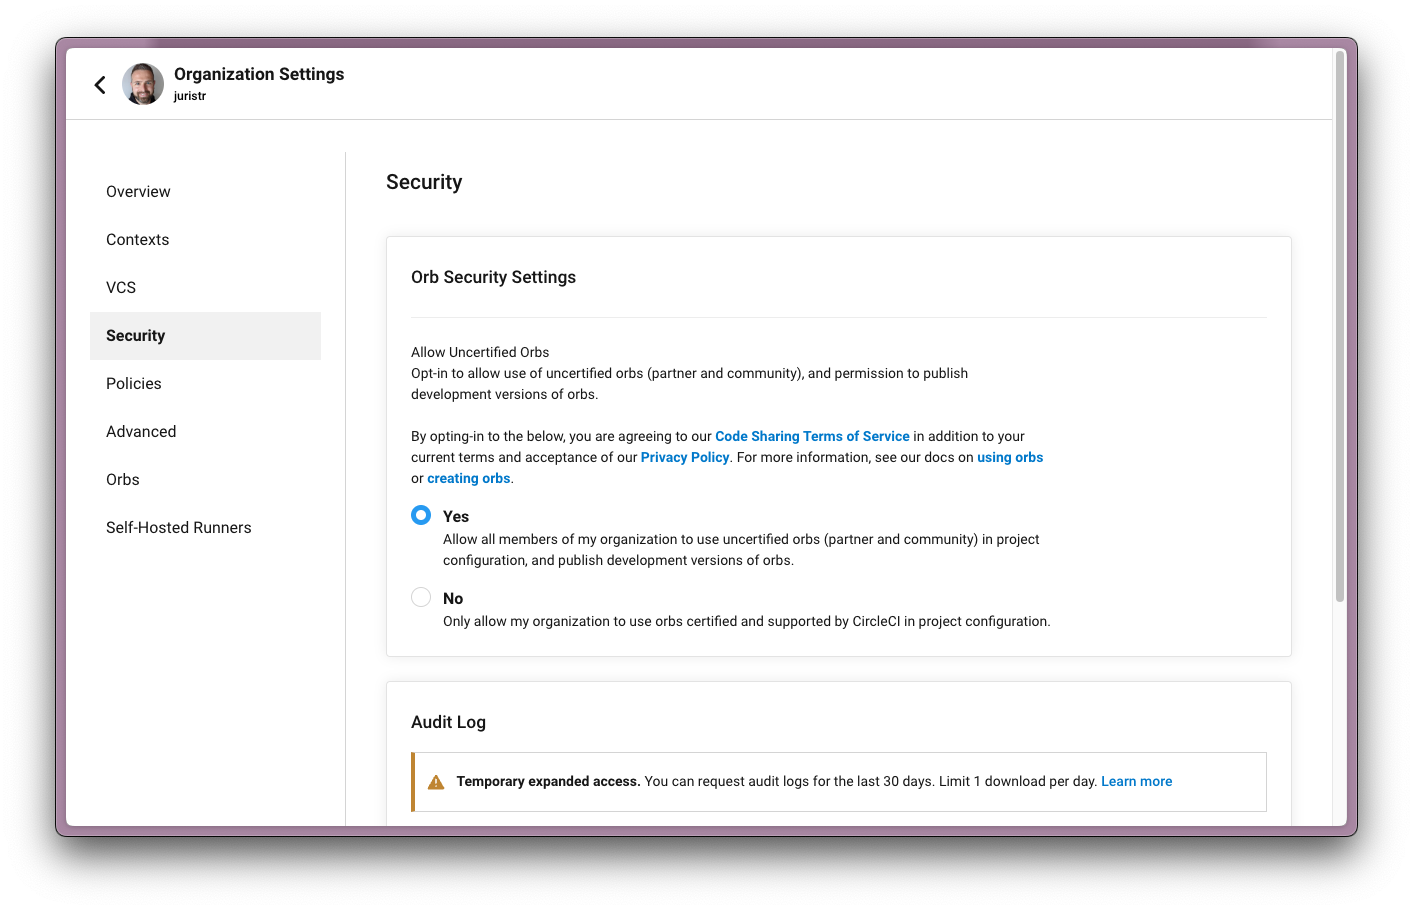
In order to use the nrwl/nx orb, you need to enable the use of third-party Circle CI orbs in your organization settings. In the Circle CI project dashboard, go to Organization Settings -> Security and select Yes under Orb Security Settings: Allow Uncertified Orbs.
Using the Affected Commands in our Pipeline
Let's adjust our CI pipeline configuration to use the affected command. Create a new branch called ci-affected and create a PR with the following configuration:
1version: 2.1
2orbs:
3 nx: nrwl/nx@1.5.1
4jobs:
5 main:
6 docker:
7 - image: cimg/node:lts-browsers
8 steps:
9 - checkout
10 - restore_cache:
11 key: npm-dependencies-{{ checksum "pnpm-lock.yaml" }}
12 - run:
13 name: install dependencies
14 command: pnpm install --frozen-lockfile
15 - save_cache:
16 key: npm-dependencies-{{ checksum "pnpm-lock.yaml" }}
17 paths:
18 - node_modules
19 - ~/.cache/Cypress
20 - nx/set-shas
21
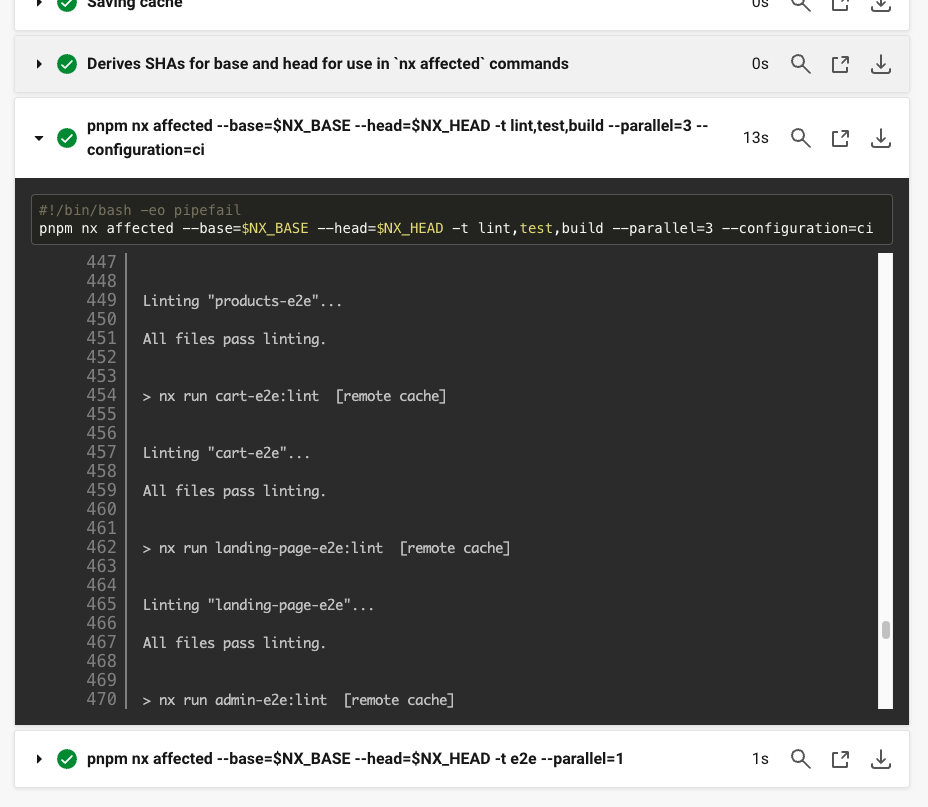
22 - run: pnpm nx affected --base=$NX_BASE --head=$NX_HEAD -t lint,test,build --parallel=3 --configuration=ci
23 - run: pnpm nx affected --base=$NX_BASE --head=$NX_HEAD -t e2e --parallel=1
24workflows:
25 build:
26 jobs:
27 - main
28Notice how we're using the $NX_BASE and $NX_HEAD environment variables to set the correct base and head commits to use for file comparisons.
We're also using the --parallel flag to run up to 3 lint, test or build tasks at once, but we want to make sure that only 1 e2e task is running at a time.
When you check the CI logs for this PR, you'll notice that no tasks were run by the affected command. That's because the .circleci/config.yml file is not an input for any task. We should really double check every task whenever we make changes to the CI pipeline, so let's fix that by adding an entry in the sharedGlobals array in the nx.json file.
1{
2  "namedInputs": {
3    "default": ["{projectRoot}/**/*", "sharedGlobals"],
4    "sharedGlobals": [
5      "{workspaceRoot}/babel.config.json",
6      "{workspaceRoot}/.circleci/config.yml" // add this line
7    ]
8    // etc...
9  }
10}
11
Merge your PR into the main branch when you're ready to move to the next section.
Enable Remote Caching on Circle CI
Reducing the number of tasks to run via affected commands (as seen in the previous section) is helpful, but might not be enough. By default Nx caches the results of tasks on your local machine. But CI and local developer machines are still performing the same tasks on the same code - wasting time and money. The Nx Cloud remote cache can eliminate that waste for you.
~/workspace❯
pnpm nx connect
1$ nx g nx:connect-to-nx-cloud --quiet --no-interactive
2
3 > NX Distributed caching via Nx Cloud has been enabled
4
5 In addition to the caching, Nx Cloud provides config-free distributed execution,
6 UI for viewing complex runs and GitHub integration. Learn more at https://nx.app
7
8 Your workspace is currently unclaimed. Run details from unclaimed workspaces can be viewed on cloud.nx.app by anyone
9 with the link. Claim your workspace at the following link to restrict access.
10
11 https://cloud.nx.app/orgs/workspace-setup?accessToken=[YourAccessTokenHere]
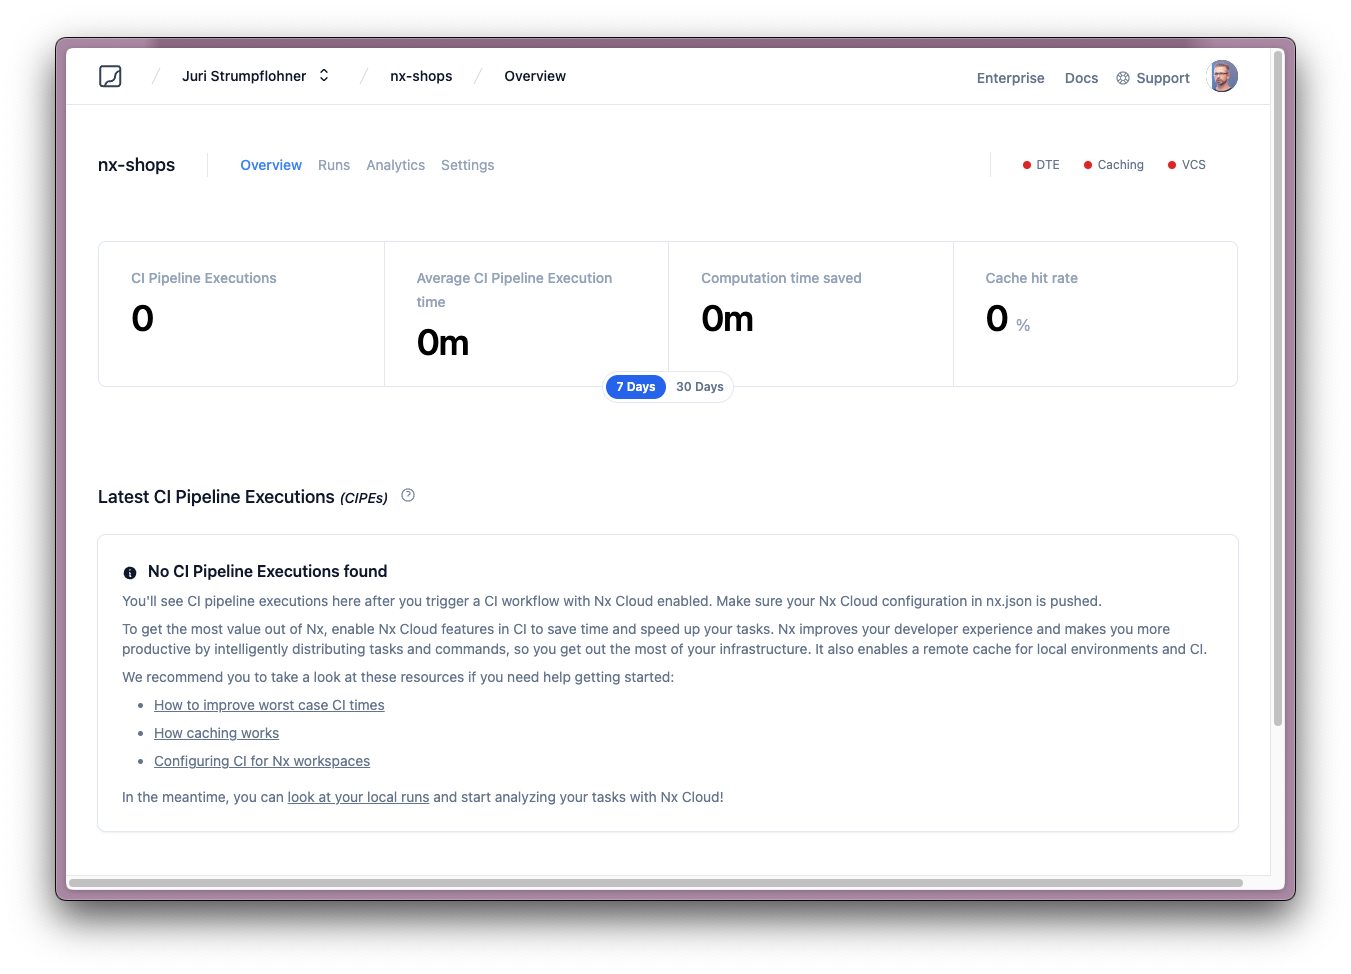
12Click the link in the terminal to claim your workspace on nx.app. Once your workspace is successfully connected you should see an empty dashboard.
Once your workspace is connected to Nx Cloud, run some tasks locally to prime the cache:
❯
pnpm nx run-many -t lint,test,build,e2e
Now let's commit the changes to a new ci-caching branch and create a PR. The only change to the source code is adding an nxCloudAccessToken property to nx.json.
1{
2 ...
3 "nxCloudAccessToken": "MWM4NTU..."
4}
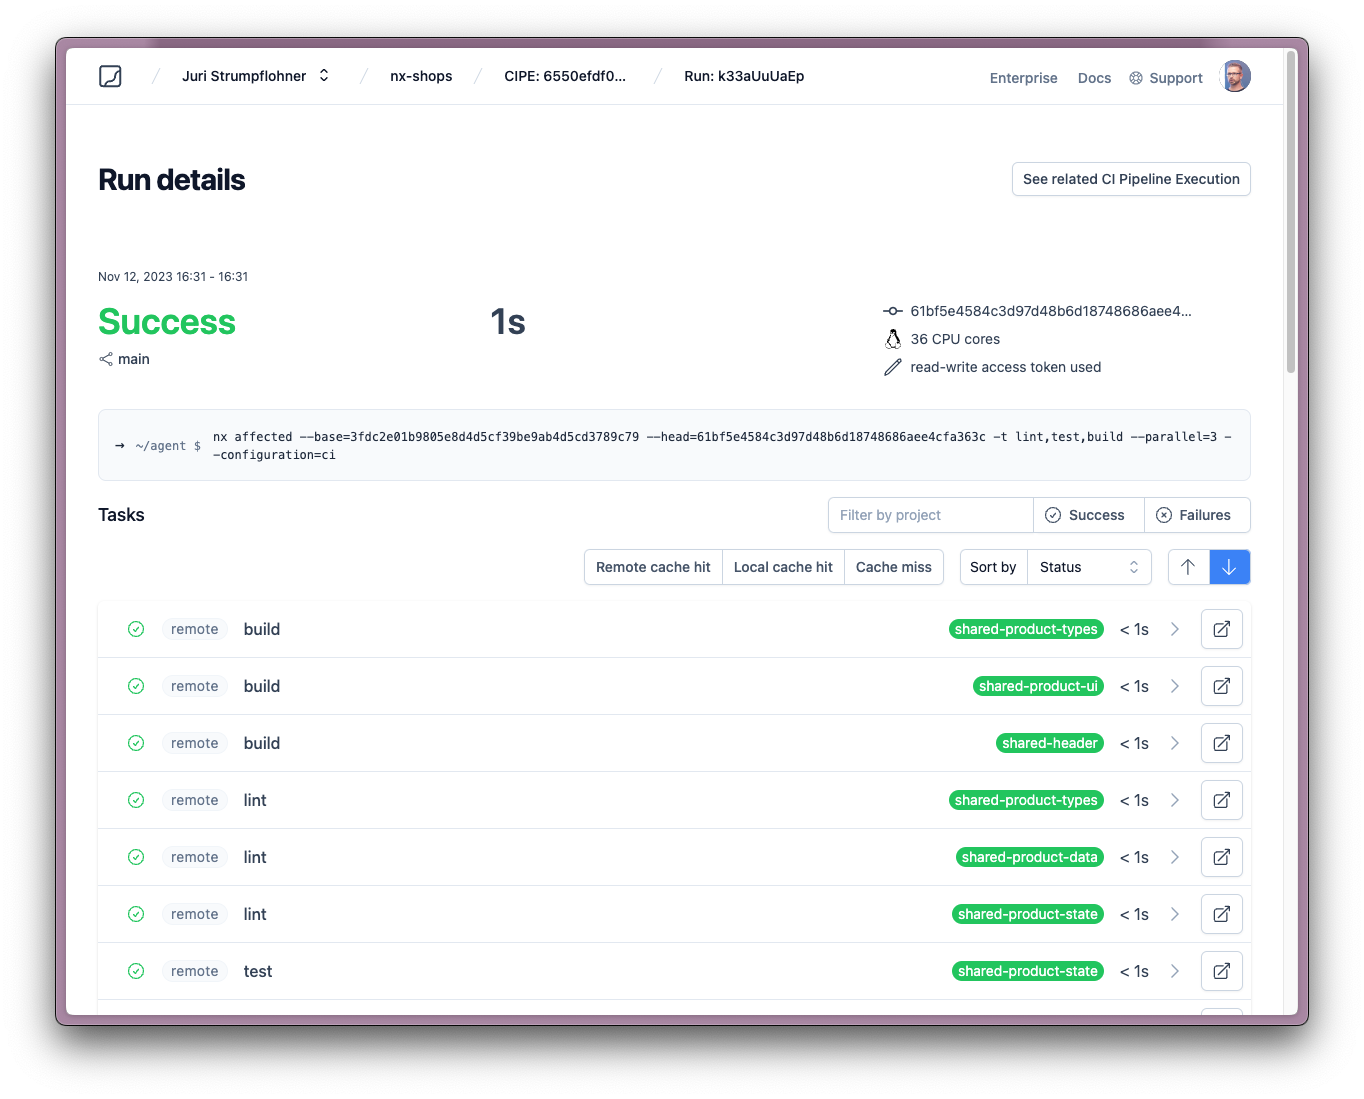
5When Circle CI now processes our tasks they'll only take a fraction of the usual time. If you inspect the logs a little closer you'll see a note saying [remote cache], indicating that the output has been pulled from the remote cache rather than running it. The full log of each command will still be printed since Nx restores that from the cache as well.
The commands could be restored from the remote cache because we had run them locally before pushing the changes, thus priming the cache with the results. You can configure whether local runs should be read-only or read/write. Our docs page has more details on security settings for your remote cache.
You might also want to learn more about how to fine-tune caching to get even better results.
Merge your PR into the main branch when you're ready to move to the next section.
Parallelize Tasks across Multiple Machines
The affected command and remote caching help speed up the average CI time, but there will be some PRs that affect everything in the repository. The only way to speed up that worst case scenario is through efficient parallelization. The best way to parallelize CI with Nx is to use distributed task execution (DTE).
Nx Cloud's DTE feature
- takes a command (e.g.
run-many -t build,lint,test,e2e) and splits it into individual tasks which it then distributes across multiple agents - distributes tasks by considering the dependencies between them; e.g. if
e2edepends onbuild, Nx Cloud will make sure thatbuildis executed beforee2e; it does this across machines - distributes tasks to optimize for CPU processing time and reduce idle time by taking into account historical data about how long each task takes to run
- collects the results and logs of all the tasks and presents them in a single view
- automatically shuts down agents when they are no longer needed
Let's enable DTE in our CI pipeline configuration. First let's define the agent which restores the NPM dependencies and then runs the nx-cloud start-agent command which notifies Nx Cloud that this machine is waiting to run tasks that are assigned to it. no_output_timeout: 60m means that this agent will automatically shut down if it doesn't receive any instructions for 60 minutes.
1version: 2.1
2orbs:
3  nx: nrwl/nx@1.5.1
4jobs:
5  agent:
6    docker:
7      - image: cimg/node:lts-browsers
8    parameters:
9      ordinal:
10        type: integer
11    steps:
12      - checkout
13      - restore_cache:
14          key: npm-dependencies-{{ checksum "pnpm-lock.yaml" }}
15      - run:
16          name: install dependencies
17          command: pnpm install --frozen-lockfile
18      - save_cache:
19          key: npm-dependencies-{{ checksum "pnpm-lock.yaml" }}
20          paths:
21            - node_modules
22            - ~/.cache/Cypress
23      - run:
24          command: pnpm nx-cloud start-agent
25          no_output_timeout: 60m
26  main: ...
27
The main job looks very similar to the previous configuration, with the addition of a single line above the nx affected commands.
1version: 2.1
2orbs:
3  nx: nrwl/nx@1.5.1
4jobs:
5  agent:
6    - ...
7  main:
8    docker:
9      - image: cimg/node:lts-browsers
10    steps:
11      - checkout
12      - restore_cache:
13          key: npm-dependencies-{{ checksum "pnpm-lock.yaml" }}
14      - run:
15          name: install dependencies
16          command: pnpm install --frozen-lockfile
17      - save_cache:
18          key: npm-dependencies-{{ checksum "pnpm-lock.yaml" }}
19          paths:
20            - node_modules
21            - ~/.cache/Cypress
22      - nx/set-shas
23
24      - run: pnpm nx-cloud start-ci-run --stop-agents-after="e2e"
25
26      - run: pnpm nx affected --base=$NX_BASE --head=$NX_HEAD -t lint,test,build --parallel=3 --configuration=ci
27      - run: pnpm nx affected --base=$NX_BASE --head=$NX_HEAD -t e2e --parallel=1
28
nx-cloud start-ci-runlets Nx know that all the tasks after this line should be orchestrated with Nx Cloud's DTE process--stop-agents-after="e2e"lets Nx Cloud know which line is the last command in this pipeline. Once there are no more e2e tasks for an agent to run, Nx Cloud will automatically shut them down. This way you're not wasting money on idle agents while a particularly long e2e task is running on a single agent.
Finally in the workflows section we instantiate the number of agents we want to run. The full pipeline configuration looks like this:
1version: 2.1
2orbs:
3  nx: nrwl/nx@1.5.1
4jobs:
5  agent:
6    docker:
7      - image: cimg/node:lts-browsers
8    parameters:
9      ordinal:
10        type: integer
11    steps:
12      - checkout
13      - restore_cache:
14          key: npm-dependencies-{{ checksum "pnpm-lock.yaml" }}
15      - run:
16          name: install dependencies
17          command: pnpm install --frozen-lockfile
18      - save_cache:
19          key: npm-dependencies-{{ checksum "pnpm-lock.yaml" }}
20          paths:
21            - node_modules
22            - ~/.cache/Cypress
23      - run:
24          command: pnpm nx-cloud start-agent
25          no_output_timeout: 60m
26  main:
27    docker:
28      - image: cimg/node:lts-browsers
29    steps:
30      - checkout
31      - restore_cache:
32          key: npm-dependencies-{{ checksum "pnpm-lock.yaml" }}
33      - run:
34          name: install dependencies
35          command: pnpm install --frozen-lockfile
36      - save_cache:
37          key: npm-dependencies-{{ checksum "pnpm-lock.yaml" }}
38          paths:
39            - node_modules
40            - ~/.cache/Cypress
41      - nx/set-shas
42
43      - run: pnpm nx-cloud start-ci-run --stop-agents-after="e2e"
44
45      - run: pnpm nx affected --base=$NX_BASE --head=$NX_HEAD -t lint,test,build --parallel=3 --configuration=ci
46      - run: pnpm nx affected --base=$NX_BASE --head=$NX_HEAD -t e2e --parallel=1
47workflows:
48  build:
49    jobs:
50      - agent:
51          matrix:
52            parameters:
53              ordinal: [1, 2, 3]
54      - main
55
Try it out by creating a new PR with the above changes.
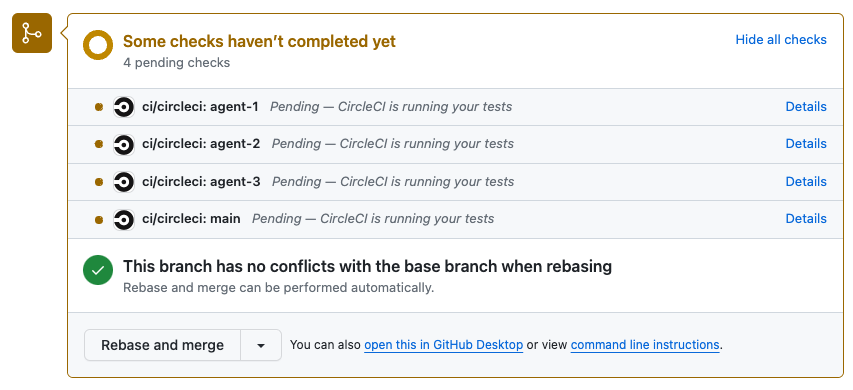
Once Circle CI starts, you should see multiple agents running in parallel:
If you open your Nx Cloud dashboard, you'll get a better view of the individual tasks and their corresponding logs.
With this pipeline configuration in place, no matter how large the repository scales, Nx Cloud will adjust and distribute tasks across agents in the optimal way. If CI pipelines start to slow down, just add some agents to the ordinal: [1, 2, 3] array. One of the main advantages is that such a pipeline definition is declarative. We just give instructions what commands to run, but not how to distribute them. As such even if our monorepo structure changes and evolves over time, the distribution will be taken care of by Nx Cloud.
Next Steps
You now have a highly optimized CI configuration that will scale as your repository scales. See what else you can do with Nx Cloud.
- Set up GitHub PR integration to view Nx Cloud results directly in your PR
- Choose the security settings that make sense for your organization
- Record non-Nx commands and view the results in the Nx Cloud interface